Table of contents
- Why You’ll Love This Chocolate Crinkle Cookies
- What You’ll Need
- How to Make Chocolate Crinkle Cookies
- Timing & Servings
- How to Serve It
- Make It Your Own
- Michelle’s Kitchen Notes
- Storing & Prepping Ahead
- Nutritional Info
- Related Recipes You’ll Love
- Learn More or Try a Twist
- Frequently Asked Questions
- Final Thoughts
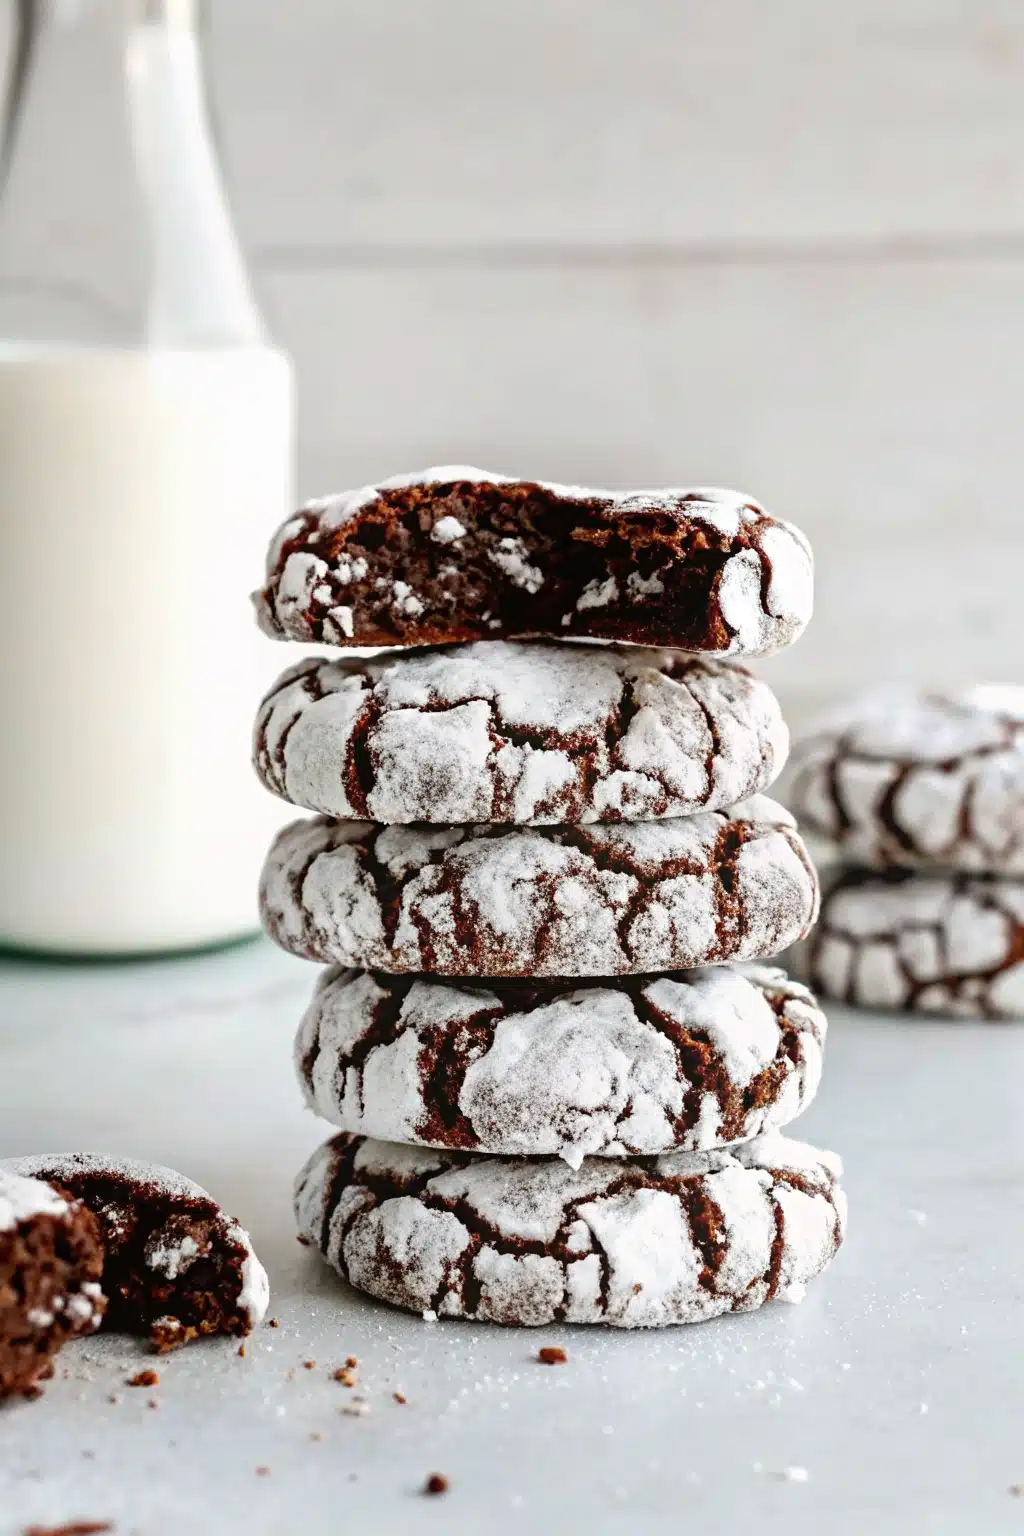
There’s something magical about watching Chocolate Crinkle Cookies transform in the oven – those perfect cracks appearing like little snow-covered mountains across their rich, chocolatey surface. This one’s close to my heart because it reminds me of my grandmother’s holiday baking marathons, when the whole house would smell like cocoa and vanilla, and we’d all gather around the kitchen island, waiting for that first warm bite.
What makes these cookies so special isn’t just their stunning appearance (though they do look like they belong in a bakery window). It’s the way they manage to be both sophisticated and comforting at the same time. The outside gets that beautiful crackled coating of powdered sugar, while the inside stays perfectly soft and fudgy. And here’s the best part – they’re naturally gluten-free, so everyone at your table can enjoy them without missing a beat.
If you’re already thinking about building a collection of crowd-pleasing cookies, you’ll want to check out my Brown Butter Chocolate Chip Cookies too – they make the perfect pair for any cookie platter.
Let’s get into the kitchen.
Table talk
with Michelle!
I’ve baked Easy Chocolate Crinkle Cookies Recipe for countless gatherings—holiday parties, bake sales, or cozy nights in. They disappear fast! Simple to customize, great for prepping ahead, and even my picky eaters can’t resist grabbing seconds. A must-try classic!
Michelle
Why You’ll Love This Chocolate Crinkle Cookies
These cookies have earned their place in kitchens across generations for good reason. First, they’re absolutely stunning to look at – those dramatic white cracks against the dark chocolate base make them showstoppers on any dessert table. You’ll love how they give you that bakery-quality appearance with surprisingly simple techniques.
The flavor is pure comfort in cookie form. Rich, deeply chocolatey, with just the right amount of sweetness that doesn’t overwhelm. They’re soft and chewy in the center while maintaining a slightly crisp edge – that perfect cookie texture we all crave.
What really wins me over is how forgiving this recipe is. The dough actually gets better with time in the fridge, so you can make it up to three days ahead. Perfect for busy holiday schedules or when you want fresh cookies without the last-minute stress.
Plus, they’re naturally gluten-free, which means you’re not making a separate batch for family members with dietary restrictions. Everyone gets to enjoy the same delicious cookies, and honestly, most people can’t even tell the difference.
What You’ll Need
- Gluten-free flour – I use a measure-for-measure blend that gives these cookies their perfect tender crumb without any grittiness
- Unsweetened cocoa powder – This is where the deep chocolate flavor comes from, so don’t skimp on quality here
- Baking soda – The secret to those beautiful cracks as the cookies rise and spread in the oven
- Kosher salt – Just a touch to enhance all those chocolate flavors and balance the sweetness
- Butter – Room temperature is key for proper creaming with the sugars
- Granulated sugar – Creates structure and that lovely crisp exterior
- Brown sugar – Adds moisture and a hint of caramel depth
- Large eggs – Bring everything together and add richness
- Vanilla extract – Pure vanilla makes all the difference in flavor
- Granulated sugar for rolling – The first coating that helps the powdered sugar stick
- Powdered sugar for rolling – Creates those gorgeous white cracks we love
How to Make Chocolate Crinkle Cookies
- Whisk together the gluten-free flour, cocoa powder, baking soda, and salt in a medium bowl. Set this aside – it’s your dry team ready to join the party.
- Beat the butter, granulated sugar, and brown sugar together until smooth. Don’t rush this step – proper creaming is what gives you tender cookies.
- Add the eggs and vanilla, then beat on medium until light and fluffy, about 2-3 minutes. You’ll see the mixture get noticeably lighter in color.
- Mix in the dry ingredients until just combined. Scrape down the bowl halfway through – those sneaky flour pockets love to hide!
- Cover and refrigerate the dough for at least 2 hours, or up to 3 days. This chilling time is crucial for the right texture and those perfect cracks.
- Preheat your oven to 350°F and line large baking sheets with parchment paper. Trust me, the parchment makes cleanup so much easier.
- Scoop the dough into 2-tablespoon balls, then roll each ball first in granulated sugar, then generously in powdered sugar. Don’t be shy with that powdered sugar!
- Place cookies on prepared baking sheets about 2 inches apart. They’ll spread just enough to need that space.
- Bake for 10-12 minutes until edges are set but centers still look soft.
System: They’ll continue cooking on the hot pan after you remove them.
10. Cool on the baking sheet for 5 minutes, then transfer to a wire rack. This prevents them from breaking while they’re still tender.
Timing & Servings
This recipe comes together in just about 20 minutes of active prep time, with 10 minutes in the oven. The total time is 2.5 hours when you include that important chilling period – but honestly, that’s mostly hands-off time where you can wrap presents or start dinner.
These beauties make 24 generous cookies, which feeds a crowd comfortably or gives you plenty for gift-giving. I always make the full batch because they disappear faster than you’d think, and having extras in the freezer is never a bad thing!
How to Serve It
These Chocolate Crinkle Cookies are natural holiday showstoppers – arrange them on a festive platter with some evergreen sprigs, and you’ve got an instant centerpiece. The white cracks look like fresh snow, making them perfect for winter gatherings.
For everyday treats, I love serving them slightly warm with a glass of cold milk or a mug of hot coffee. They’re also wonderful for school bake sales since they travel well and look professionally made.
Kids absolutely love the dramatic appearance, and they’re fun to make together since the rolling process is so hands-on. Let little ones help with the powdered sugar coating – it’s messy but magical.
They’re also perfect for cookie exchanges because they photograph beautifully and taste even better. Pack them in clear containers so people can see those gorgeous cracks through the packaging.
Make It Your Own
- Double chocolate version – Fold in ½ cup of mini chocolate chips for extra indulgence
- Peppermint twist – Add ½ teaspoon peppermint extract and crushed candy canes to the powdered sugar
- Espresso enhancement – Mix 1 tablespoon instant espresso powder into the dry ingredients for a mocha flavor
- Orange zest surprise – Add the zest of one orange for a bright, unexpected note that pairs beautifully with chocolate
Michelle’s Kitchen Notes
The chilling time isn’t optional – I learned this the hard way when I tried to rush a batch for unexpected guests. Without proper chilling, the cookies spread too much and you lose those beautiful cracks. Plan ahead and let that dough rest.
Don’t overbake these! The centers should still look slightly underdone when you pull them out. I used to think they needed to look completely set, but that leads to dry cookies. Trust the timing and let the residual heat finish the job.
Room temperature butter makes all the difference in the creaming process. If you forgot to take it out early, cut it into small pieces and let it sit for 15 minutes – much faster than trying to cream cold butter.
The Chocolate Crinkle Cookies – Serious Eats test kitchen has some fascinating insights about the science behind those perfect cracks – understanding the ‘why’ behind each cooking step really helped me nail the technique.
Storing & Prepping Ahead
Store your finished cookies in an airtight container at room temperature for up to one week. Layer them with parchment paper to prevent sticking – that powdered sugar coating can get a bit clingy.
For freezing, these cookies are champions. Freeze baked cookies for up to 3 months in freezer-safe containers. You can also freeze the dough balls after rolling in both sugars – just bake directly from frozen, adding an extra minute or two to the baking time.
The make-ahead magic happens with that dough. Mix it up to 3 days early and keep it covered in the fridge. The flavor actually improves with time, and the texture gets even better.
For gift-giving, pack them in tins or boxes with tight-fitting lids. They ship well too, just make sure to cushion them properly so those beautiful surfaces don’t get damaged.
Nutritional Info
Here’s what you’re getting in each 132-calorie cookie – not too shabby for such an indulgent treat! Each cookie has 5 grams of fat, 2 grams of protein, and 23 grams of carbohydrates.
You’ll also get 2 grams of fiber (thanks to that cocoa powder), 15 grams of sugar, and 131 mg of sodium. They’re naturally gluten-free, which makes them accessible to more people at your gatherings.
The Chocolate Crinkle Cookies – Allrecipes community has tested this recipe thousands of times, and many home cooks share helpful modifications in their reviews – definitely worth checking if you want to adjust the nutrition profile.
Related Recipes You’ll Love
- Pistachio Shortbread Cookies
- Classic Sugar Cookies
- Brown Butter Chocolate Chip Cookies
- Chewy Soft Snickerdoodle Cookie
Learn More or Try a Twist
The Chocolate Crinkle Cookies – Food Network features professional chef techniques that can help you achieve restaurant-quality results at home. Their test kitchen insights about timing and temperature details are particularly helpful.
I also love diving into the history of crinkle cookies – they’re an American invention from the 1960s that quickly became a holiday tradition. Understanding that background makes me appreciate how this simple recipe has brought families together for generations.
Frequently Asked Questions
Chill dough for at least 2 hours and roll generously in granulated then powdered sugar. Overmixing can also prevent cracks.
Yes, use the same amount of all-purpose flour. Don’t overmix to keep cookies tender and fudgy.
Keep in an airtight container at room temp for 1 week or freeze for 3 months. Freeze dough balls for easy baking later.
Final Thoughts
There’s something truly special about a recipe that looks complicated but comes together with simple, honest ingredients and techniques. These Chocolate Crinkle Cookies prove that the best treats don’t need fancy equipment or hard-to-find ingredients – just good chocolate flavor, proper technique, and a little patience for that chilling time.
What I love most is watching people’s faces when they bite into one for the first time. That soft, fudgy center contrasting with the sweet, crackled exterior never fails to surprise and delight. It’s not fancy, but it’s full of love – exactly what the best family recipes should be.
Thanks for being in my kitchen today. Let me know how yours turns out!
If you give Easy Chocolate Crinkle Cookies Recipe a try, I’d love to hear how it turned out!
Please take a moment to leave a rating and a quick review—it really helps us keep sharing free, delicious recipes you can trust.
Easy Chocolate Crinkle Cookies Recipe
- Prep Time: 20m
- Cook Time: 10m
- Total Time: 150m
- Yield: 24
- Category: Dessert
- Method: Baking
- Cuisine: American
Description
These gluten-free chocolate crinkle cookies are soft, chewy, and rich in chocolate flavor with a beautiful powdered sugar coating that cracks as they bake.
Ingredients
- 1¾ cups (262g) gluten-free measure-for-measure flour
- ½ cup (41g) unsweetened cocoa powder
- 1 teaspoon baking soda
- ½ teaspoon kosher salt
- ½ cup (113g) butter (at room temperature)
- ¾ cup (150g) granulated sugar
- ¼ cup (53g) brown sugar
- 2 large eggs
- 2 teaspoons vanilla extract
- ½ cup (66g) granulated sugar (for rolling)
- ½ cup (40g) powdered sugar (for rolling)
Instructions
- In a medium bowl, whisk together the gluten-free flour, cocoa powder, baking soda and salt. Set aside.
- In the bowl of a stand mixer, or using a hand mixer, beat the butter, granulated sugar and brown sugar together until smooth.
- Add the eggs and vanilla and beat on medium until light and fluffy, about 2-3 minutes.
- Add the dry ingredients to the wet ingredients and mix until combined. Scraping down the bottom and sides of the bowl halfway through.
- Cover the bowl and refrigerate the dough for at least 2 hours, or up to 3 days.
- Preheat the oven to 350°F. Line large baking sheets with parchment paper or silicone baking mats.
- Scoop the cookie dough into round balls, about 2 tablespoons per ball. Roll each dough ball in the granulated sugar, then roll generously in the powdered sugar.
- Place on the prepared baking sheet, about 2 inches apart.
- Bake for 10-12 minutes, or until the edges are set, but the centers are still soft.
- Remove from the oven and cool on the baking sheet for 5 minutes. Transfer to a wire rack to cool completely.
Notes
Be sure to chill the dough well for the signature crinkle effect and optimal chewy texture.
Nutrition
- Serving Size: 1 cookie
- Calories: 132 kcal
- Sugar: 15 g
- Sodium: 131 mg
- Fat: 5 g
- Carbohydrates: 23 g
- Fiber: 2 g
- Protein: 2 g


