Table of contents
There’s a certain kind of dessert that doesn’t just satisfy a sweet tooth—it draws everyone into the kitchen before it’s even ready. I’ll never forget the summer afternoon when my neighbor Sarah showed up at my door, laughing so hard she could barely speak. She’d tried to bake an elaborate cake for her daughter’s birthday and ended up with what she called “a bowl of chocolate soup.” That’s when I handed her this No Bake Oreo Delight—a foolproof, no-stress treat that turned her day around and quickly became her go-to favorite.
This recipe holds a special place in my heart because it proves you don’t need an oven—or advanced baking skills—to whip up something truly showstopping. With just a handful of everyday ingredients and about 25 minutes of prep, you’ll create a dessert that looks bakery-worthy and tastes like pure nostalgia. Each creamy, chocolatey layer is comfort in every bite.
Whether you’re prepping for a family get-together, a last-minute potluck, or just craving something sweet and effortless, this No Bake Oreo Delight is your ticket to dessert magic. Ready to wow your crowd? Let’s dive in.
Table talk
with Michelle!

No matter the occasion—potluck, holiday, or just a chocolate craving—No Bake Oreo Delight always hits the spot. I’ve made it more times than I can remember, and it disappears every single time. Rich, creamy, and no oven needed—what’s not to love?
Michelle
Why You’ll Love This No Bake Oreo Delight
It’s foolproof and forgiving. Even if you’re new to making layered desserts, this recipe guides you through each step with confidence. There’s no temperamental baking involved – just simple mixing, spreading, and chilling.
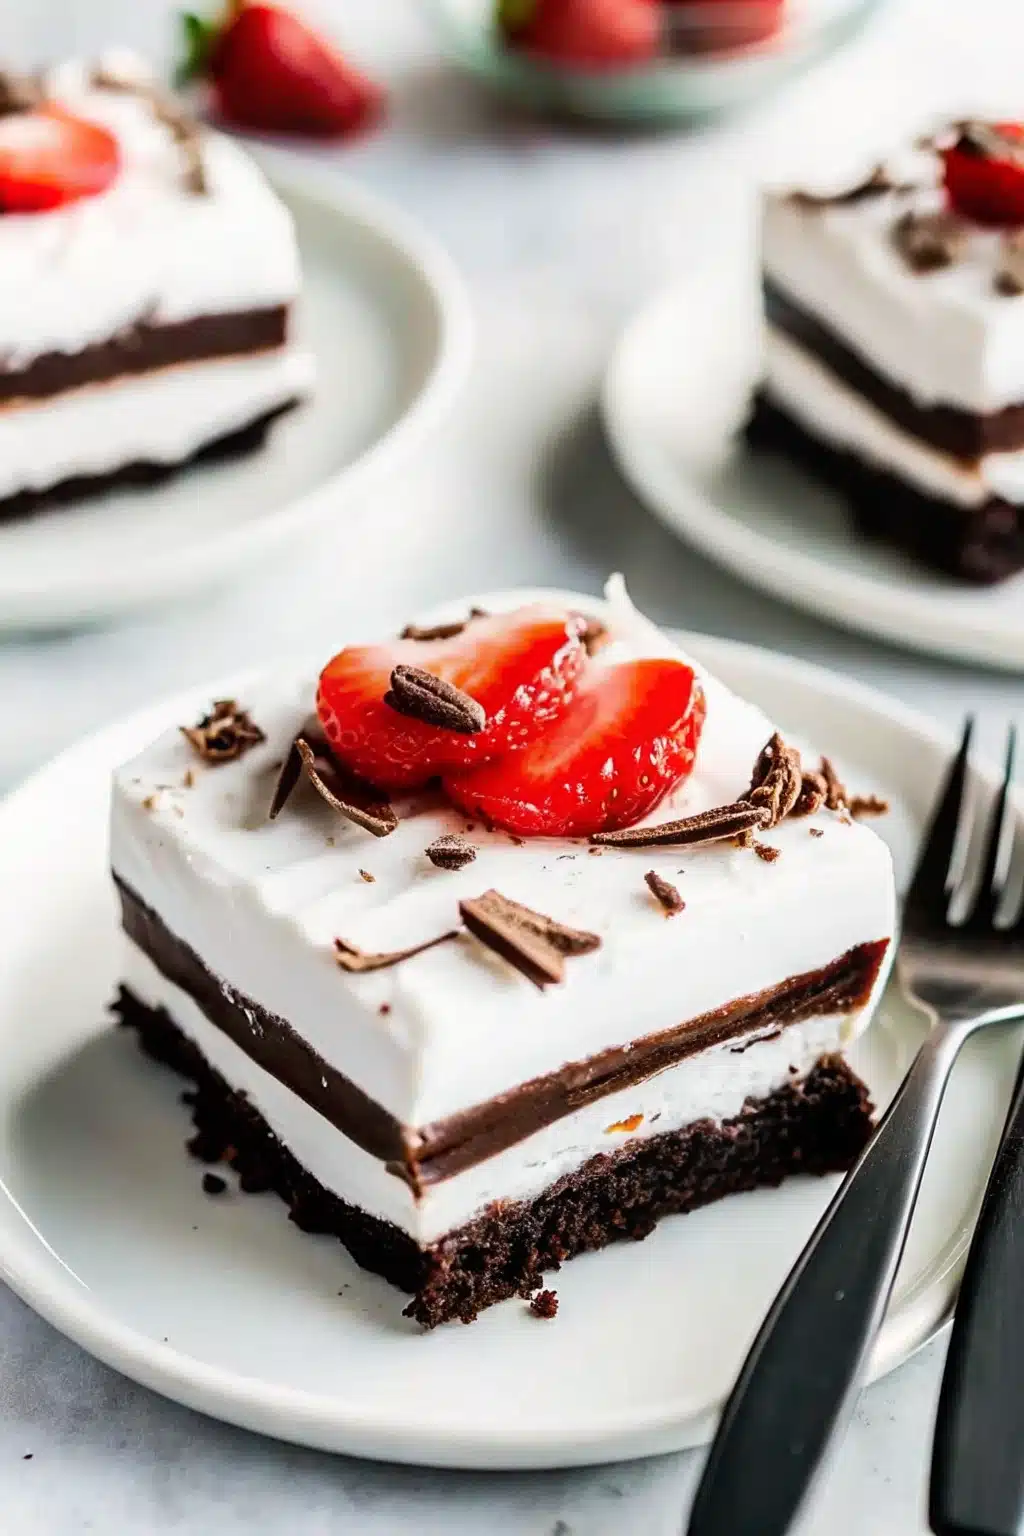
Every bite is pure indulgence. We’re talking about a crunchy Oreo crust, a silky cream cheese layer, rich chocolate pudding, and fluffy whipped topping. It’s like getting four desserts in one perfect bite.
It feeds a crowd beautifully. This recipe serves 10 generous portions, making it ideal for family dinners, church potlucks, or neighborhood gatherings. Plus, it actually gets better as it sits, so you can make it ahead of time.
Kids can help with every step. From crushing cookies to spreading layers, this is one of those recipes where little hands can truly contribute. Some of my favorite kitchen memories involve making this with my grandkids.
What You’ll Need
Let me walk you through each ingredient and why it matters for creating the perfect no bake dessert:
- Oreo cookies – I always use a full package because we need enough for that thick, satisfying crust. Regular or double-stuffed both work beautifully, though double-stuffed gives you extra sweetness.
- Butter – This binds our cookie crust together. Make sure it’s melted but not hot, or it’ll make your cookies soggy instead of creating that perfect crumbly base.
- Cool Whip – We’re dividing this between two layers, so don’t use it all at once! I prefer the original variety, but sugar-free works if that’s your preference.
- Cream cheese – Room temperature is absolutely crucial here. Cold cream cheese will give you lumps, and nobody wants that in their smooth, dreamy layer.
- Powdered sugar – This sweetens and helps create that perfect consistency in our cream cheese layer. It dissolves so much better than granulated sugar.
- Chocolate instant pudding – The 5.9 oz box is exactly what we need. Don’t substitute with cook-and-serve pudding – the instant variety sets up perfectly for our layered creation.
- Milk – Whole milk gives the richest flavor, but 2% works just fine if that’s what you have on hand.
Let’s Make It Together
- Crush those cookies until they’re fine crumbs. A food processor makes quick work of this, but don’t worry if you don’t have one – putting them in a sealed bag and using a rolling pin works perfectly too.
- Mix the crushed Oreos with melted butter until everything looks like wet sand. Press this mixture firmly into your 9×13 pan to create an even crust. I like to use the bottom of a measuring cup to really pack it down.
- Beat that cream cheese for a full minute until it’s completely smooth. This step is so important – any lumps now will show up in your final dessert, and we want silky perfection.
- Add half the Cool Whip and all the powdered sugar to your cream cheese. Beat until it’s fluffy and combined, then spread this heavenly mixture over your Oreo crust.
- Whisk the pudding mix with milk for exactly 2 minutes – don’t shortcut this timing. Let it set for 5 minutes until it’s thick, then gently spread it over your cream cheese layer.
- Top with the remaining Cool Whip, spreading it edge to edge for that beautiful finished look.
- Refrigerate for at least an hour, though overnight is even better. This gives all the flavors time to meld together into pure magic.
- Add your final touches just before serving – fresh strawberries or shaved chocolate make it extra special.
Serving Suggestions
This Oreo dessert shines at summer barbecues when you want something cool and refreshing. I love cutting it into neat squares and serving on pretty dessert plates with a dollop of fresh berries.
For holiday gatherings, try adding a sprinkle of crushed peppermint candies on top for a festive twist. The red and white looks stunning against the chocolate layers.
Kids’ birthday parties are where this dessert truly steals the show. Cut smaller squares and let the kids go wild – it’s messy, fun, and absolutely delicious.
For a more elegant presentation, serve in individual glass cups, layering each component so guests can see all the beautiful layers. It’s like having your own personal layered dessert masterpiece.
Make It Your Own
- Swap the cookie base – Graham crackers, vanilla wafers, or even crushed chocolate chip cookies create completely different flavor profiles while keeping the same technique.
- Change up the pudding flavor – Vanilla, butterscotch, or even pistachio pudding transforms this into an entirely new dessert experience.
- Add fruit layers – Sliced bananas between the cream cheese and pudding layers turn this into a banana cream delight.
- Make it lighter – Use sugar-free pudding, reduced-fat cream cheese, and light Cool Whip without sacrificing much flavor.
Kitchen Tips & Tricks
Don’t rush the cream cheese softening. I’ve made the mistake of trying to speed this up in the microwave, and it never ends well. Plan ahead and let it sit on your counter for about an hour.
Press that crust firmly. A loose crust will crumble when you try to serve it. I learned this the hard way at a church potluck when my beautiful dessert turned into a delicious mess.
Let the pudding set properly. Those 5 minutes aren’t just a suggestion – the pudding needs that time to thicken, or it’ll mix with your other layers instead of staying distinct.
Use a sharp knife dipped in warm water for clean cuts. Wipe the blade between cuts for those picture-perfect squares that’ll make you look like a pro.
Storage & Make-Ahead Tips
This No Bake Oreo Delight actually improves with time, making it perfect for busy schedules. Cover tightly with plastic wrap and refrigerate for up to 4 days – though it rarely lasts that long in my house.
Freezing works beautifully for up to 3 months. Let it thaw in the refrigerator overnight before serving. The texture stays remarkably close to fresh.
For make-ahead entertaining, prepare this the night before your event. The flavors meld together overnight, creating an even more delicious result.
Store leftovers in individual containers for easy grab-and-go treats throughout the week. My grandkids love finding these little surprises in the fridge.
More Recipes from My Kitchen
If you’re loving this easy approach to impressive desserts, you’ll want to try :
Frequently Asked Questions
Absolutely! Put your Oreos in a sealed plastic bag and crush them with a rolling pin. It takes a bit more effort, but the results are just as delicious. Some people actually prefer this method because you can control the texture better.
This usually happens when the cream cheese isn’t fully softened. Try pressing the mixture through a fine-mesh strainer, or next time, make sure your cream cheese sits at room temperature for at least an hour before using.
You can, but Cool Whip holds up better over time and won’t weep or separate like fresh whipped cream might. If you do use homemade, serve the dessert within 24 hours for best results.
The dessert should feel firm to the touch and hold its shape when you cut into it. If it seems too soft after an hour, give it more time – patience really pays off with this recipe.
Definitely! Use two 9×13 pans or one large sheet pan. Just keep the layer proportions the same, and you’ll have enough Oreo delight to feed a small army.
Final Thoughts
This No Bake Oreo Delight proves that some of the best things in life really are the simplest. There’s something so satisfying about creating layers of pure deliciousness without ever turning on your oven. Every time I make this, I’m reminded that cooking doesn’t have to be complicated to be meaningful.
What I love most about this recipe is how it brings people together. Whether you’re making it with your kids on a rainy afternoon or preparing it for a special celebration, it creates those sweet moments that become treasured memories. The recipe is forgiving, the results are consistently amazing, and the smiles it creates are absolutely priceless.
Don’t be afraid to make it your own – add your favorite toppings, switch up the flavors, or simply enjoy it exactly as written. Either way, you’re creating something special that’ll have everyone asking for the recipe.
Thanks for being in my kitchen today, and I hope this No Bake Oreo Delight becomes a beloved tradition in your home, just like it has in mine.
If you give No Bake Oreo Delight a try, I’d love to hear how it turned out!
Please take a moment to leave a rating and a quick review—it really helps us keep sharing free, delicious recipes you can trust.

No Bake Oreo Delight
- Prep Time: 20 minutes
- Cook Time: 5 minutes
- Total Time: 25 minutes
- Yield: 10
- Category: Dessert
- Method: No Bake
- Cuisine: American
Description
This No Bake Oreo Delight is a creamy, indulgent dessert with a crunchy Oreo crust, smooth cream cheese layer, rich chocolate pudding, and fluffy Cool Whip topping. Perfect for a quick, crowd-pleasing treat that requires no oven!
Ingredients
- 1 package Oreo cookies (regular or double stuffed)
- 1 stick butter (melted)
- 16 oz. Cool Whip (separated)
- 8 oz. cream cheese (at room temperature)
- 1 cup confectioners/powdered sugar
- 5.9 oz. chocolate instant pudding
- 2 ¾ cup milk
Instructions
- Crush the whole bag of Oreos in a food processor. (You can also do this by hand if needed.)
- Combine the Oreos and melted butter until well-combined. Press the mixture on the bottom of a 9×13 inch pan to make a crust.
- Using hand mixer, beat the cream cheese in a large bowl for 1 minute. Room temperature cream cheese is necessary for this layer to have a smooth consistency when combined with the next set of ingredients. Otherwise, lumps will form.
- Add HALF of of Cool Whip, and reserve the second half for the topping.
- Add the powdered sugar. Beat until well-combined and smooth. Spread across the top of the Oreo crust.
- Whisk the instant pudding and the milk for 2 minutes. Let it set for 5 minutes, then spread over the Cool Whip/sugar mixture.
- Top with remaining 8 ounces of Cool Whip.
- Refrigerate for a minimum of 60 minutes prior to serving. You can also refrigerate it overnight.
- Top with strawberries just before serving if desired. You can also add shaved chocolate to the top.
Notes
For a smoother crust, ensure Oreos are finely crushed. Add fresh strawberries or chocolate shavings for a decorative touch. Store leftovers in the refrigerator for up to 3 days.
Nutrition
- Serving Size: 10
- Calories: 589 kcal
- Sugar: 53 g
- Sodium: 662 mg
- Fat: 30 g
- Carbohydrates: 74 g
- Fiber: 2 g
- Protein: 7 g


